Benefits of using Facebook Pixel
Find benefits of using Facebook Pixel in this article which is an analytics tool which measures the efficiency of your Facebook advertising.
![]()
If you’re generating Facebook ads or you wish to use them in the future then there’s one vital tool you should start utilizing straightaway to acquire the most out of your social ad budget which is the Facebook pixel.
What is a Facebook Pixel?
According to Facebook, Pixel is an analytics tool which measures the efficiency of your Facebook advertising. By implementing it into your website, you can accurately estimate your ads’ performance since the pixel can track every visitor’s interactions on your website once they click on your ad.
Basically, it’s a piece of code that you install onto your website which then permits you to track and monitor things taking place on the site.
Every Facebook Ad account gets only one pixel, which you need to install on every single page you wish to track on your site.
What does the Facebook pixel do? What are the benefits of using Facebook Pixel?
There are numerous ways you can use data received from Facebook pixel tracking to enhance your Facebook advertising strategy.
-
Track conversions
The Facebook pixel lets you to monitor how people communicate with your website after seeing your Facebook ad
You can also track customers through their devices so you know, for instance, if people incline to view your ads on mobile but shift to a desktop before making a purchase or vice-versa. This statistics can benefit you to improve your ad strategy and estimate your return on investment.
-
Remarket/Build Custom Audience
It permits you to generate retargeting audiences centered on people that have visited your website.
If someone arrives at your website (irrespective of the source for ex: through Facebook or any other source, like Google), the pixel ‘fires’ and tracks them.
You can then go to Facebook and build what’s known as a “custom audience” around people that have visited your site.
![]()
The pixel grasps the data on website visitors for 180 days, denoting that if somebody visited your website 180 days ago, you can still target them with an ad.
This is another one of the amazing benefits of using Facebook Pixel
You can be as specific as you want with this, for instance, you can target people who have visited particular pages on your site, targeting them with a particular ad.
-
Create lookalike audiences
Facebook can make use of its targeting data to help you generate a lookalike audience of people who have related likes, interests, and demographics to people who are already communicating with your website, benefiting you to increase your probable customer base.
This is one one of the great benefits of using Facebook Pixel
-
Run effective ads
Facebook pixel can help you to make your ads much more effective by refining the quality of the ads you run, and by enhancing the targeting of the people who view them.
Also you can utilize Facebook pixel data to make sure your ads are viewed by the people who are almost assured to take your desired action.
-
Optimize Facebook Ads
Facebook has an enhanced knowledge of whom to display your ad to. For instance:
If you’re running an ad campaign which is going out to an audience of 1 million people, Facebook has to attempt to locate the people in that 1 million who are most likely to convert/take the action you need them to take
Without the pixel, Facebook has minimum idea on who to serve that ad to, so it will show the ad to anybody within that 1 million.
With the pixel, it can understand what kind of person is converting best and consequently serve your ad to more people like that.
It is really worth to experience the benefits of using Facebook Pixel.
What Actions Can a Facebook Pixel Track?
When somebody takes an action on your website when clicking on an ad, your Facebook pixel registers it as an event. Facebook can track 9 of them which are known as standard events or you can create custom conversions events.
-
Standard Events
- View content – Track key page views (article, landing page, product page)
- Search – Track searches on your website (product searches)
- Add to cart – Track when items are added to cart
- Add to wishlist – Track when items are added to wishlist
- Initiate checkout – Track when people enter your checkout flow
- Add payment info – Track when people add payment information during the checkout flow
- Make purchase – Track purchases or checkout flow completions (landing on purchase confirmation page)
- Lead – Track when someone becomes a lead (form submission, sign up for trial)
- Complete registration – Track when someone completes a registration form (complete subscription, sign up for a service)
-
Custom Conversions Events
You can utilize custom conversion events instead of standard events, or to gather more information than Facebook pixel standard events can offer.
Custom conversions make use of URL rules built on specific URLS or URL keywords. So, for instance, you might use Facebook pixel tracking to evaluate views of a particular category of products on your website, instead of tracking views of everything using the “view content” standard event.
But before you start using Facebook pixel custom conversions, you must help Facebook recognize the details of the conversion event you wish to track. For this, go to your Facebook Ads Manager, then go to Custom Conversions and click Create Custom Conversion to define your custom conversion event using URL rules.
Benefits of using Facebook Pixel are endless.
You could also generate Facebook pixel custom events by inserting additional details to standard events using extra bits of code termed as parameters. These lets you to customize the standard events based on:
How much a conversion event is worth
- Product name, category, or ID
- The number of items someone adds to their shopping cart
- A specific search string
- The status of a registration
How to Create a Facebook Pixel and add it to your website?
You can use Facebook pixel tracking to receive data on two diverse events: a set of nine standard events that Facebook has predefined (which are mentioned above), or custom conversions which you set up yourself. An “event” is basically a particular action that a visitor takes on your website.
![]()
Step 1: Create a Pixel
1) Open Facebook Ads Manager
2) Click on the hamburger icon and click Pixels, which is under the Measure & Report tab.
![]()
3) Click Create a Pixel
![]()
4) Name Your Pixel. Accept the terms, and click Next. When selecting the pixel’s name, note that you only get one pixel for each ad account, so the name should signify your business, instead of a specific campaign. Ex: Numero Uno’s Pixel
Step 2: Adding Facebook Pixel Code to your website
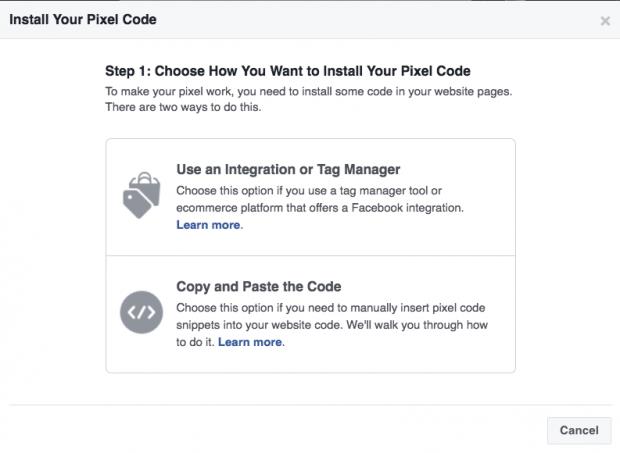
To install a Facebook Pixel into your website, you have three options:
![]()
We will select “Click on Manually Install the code yourself” method here
- Click Copy and Paste the Code.
- Copy and paste the pixel base code into the header code of your website, i.e. post it after the <head> tag but before the </head> tag. You should paste it into every single page or into your template if you’re using one. When you’re done, click Next.
![]()
- Copy the applicable event code (standard or custom) based on the actions you wish to track on your website. For custom conversion code, click Custom Event. This Facebook help article can help you figure out which type of setup is best for you: basic, recommended, or advanced.
![]()
- Paste the event code in the suitable location on your webpage based on the action you need to track. It should be just below the </head> tag for a new page which opens as a result of the tracked action (such as a thank you page). Or, you can attach the code to specific HTML elements like buttons that trigger actions within a page. When you’re done, click Next.
![]()
To add events to individual web pages, follow the instructions below:
- Click Pixels, which is under the Measure & Report tab.
- Click Set Up Pixel.
- Click Manually Install the Code Yourself.
- Click Continue.
- Click Install Events.
- Toggle the event you’d like to track.
- Choose Track Event on Page Load or Track Event on Inline Action
![]()
If landing on a particular webpage triggers an event, for ex: someone landing on a Thank You page after filling out a lead generation form, select the Track Event on Page Load option.
If an event can only be triggered when someone clicks a call-to-action, such as the add to wishlist button, select the Track Event on Inline action option.
8. Insert event parameters, such as Conversion Value or Currency, to give particular events a concrete value
9. Place code on webpage.
For page load events, copy and paste the code right below the closing header section of the web page. This will usually be just after the opening <body> tag.
For inline action events, copy and paste the code between script tags next to the call-to-action you’re tracking.
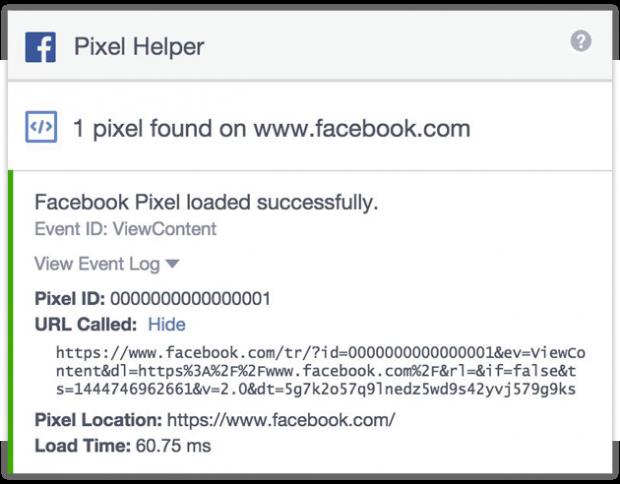
Step 3: Confirm your Facebook pixel is working
Before you begin to trust the data from your Facebook pixel, you must confirm whether it’s working correctly.
- Download the Facebook Pixel Helper extension for Google Chrome.
- Visit the page where you have installed the Facebook pixel. If the extension discovers the pixel, the </> icon will turn blue, and a popup will specify how many pixels are found on the page. The popup will also let you know if your pixel is working correctly. If not, it will give error information so you can make corrections.
- You can also go to your website and load a page.
Then head back to the “Pixels” tab in Ads Manager and in the top right next to details it should have a green dot and say when the pixel was last active.
![]()
Note: The current Facebook pixel integrates two older pixel versions: the conversion tracking pixel and custom audience pixel. Facebook discontinued the conversion tracking pixel on February 17, 2017.
If you were using the Facebook conversion pixel, you’ll need to switch over to the new Facebook pixel. You can learn how to do so in this Facebook business help article .
If you were using the old custom audience pixel, these instructions for Facebook pixels explain how to upgrade to the new version.
Final Thoughts:
Benefits of using Facebook Pixel are many.You should know how to use them at your dispense.It will surely help you in many ways.
Facebook Pixel is an essential tool for all Facebook marketers. If you wish to be able to precisely monitor your campaigns’ ROI and utilize off-platform retargeting (and you must without question want to do both), you need Facebook’s tracking pixel.
Don’t forget to share this article with your friends and experience the great benefits of using Facebook Pixel.
Do share your comments at info@numero-uno-inc.com
Cheers,
Hemant
Kindly read our other blog articles on SEO, Adwords, Social Media etc.